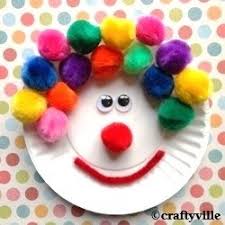
 There are hundreds upon hundreds of art and craft projects that you can make that require NO special skills or tools with the help of paper plates and that take less than half an hour of your time.
Paper plate is one of the best craft supplies to turn your imagination into a beautiful craft! So Let’s turn a lazy afternoon into a fun time by transforming ordinary paper plates into entertaining craft project!
Here we’re going to present one of the best easy art and craft ideas for your creative projects:
Happy crafting!
- Apple paper plate:

It’s very easy and fun to make. This is the best letter ‘A’ craft. What else can be the Better way to teach alphabets to pre-schoolers? Our apple appears unique as compared to the traditional apple crafts mostly found on the internet because , most apple craft shows just a red apple with a green leaf on top.
(img source: https://happyhooligans.ca/)
But this apple craft actually shows the apple core. Coffee beans are used as the apple seeds, they smell amazing and make it look so interesting.
What you need to make it:
- Plain paper plate
- Red and green paint
- Leaf
- Coffee beans
- Glue
- Paint brush
How to make:
To begin, paint the rims of the paper with either green or red colour. (img source: https://happyhooligans.ca/)
Then, cut a semi circle from each side of the plate to make the shape of apple core.
(img source: https://happyhooligans.ca/)
It’s time to glue the coffee beans at the unpainted centre of the paper plate.
(img source: https://happyhooligans.ca/)
To give it a final look, let’s just pluck a leaf from a garden nearby and stick it at the top of our apple. And yayyy! It’s ready 😀
- Paper plate clock:

It can be a fun way to teach kids numbers ,and telling time .
In this digital age, most of the kids are unaware of the old fashioned analogue clocks. This craft can be helpful to familiarize them with this type of clock, the minute hand, the hour hand, and the way the numbers on the face of a clock are laid out.
What you need to make it:
- Water colours
- Numbers cut out of paper/foam
- Clock hands of paper/oam
- Paint brush
- Paper plate
How to make:
Colour the paper plate by using your paint brush, you can either make it multicoloured or plain.
(source: https://happyhooligans.ca/)
Then glue the arrows and numbers sequentially .
It will hardly take 15 minutes to make it!
- Blue-footed booby craft:
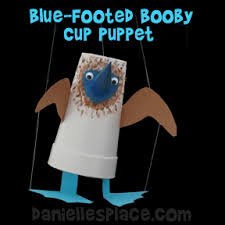
These are so unique and cute birds that use their blue feet in a mating dance, you can even colour their feet by any other colour that
You love. Try making this beautiful craft with your kids and then your hooligans can make the booby marionettes. It will be a real fun for you to try to mimic the booby dance!
- What we need to make it:
- String or heavy duty thread
- Glue gun
- Blue or brown card
- Foam cups
- 10mm wiggle eyes
- Hole punch
- Tape
- Notched craft stick
how to make:
- Let’s begin with printing out the pattern onto card stock. Then cut out the patterns and they can be used as templates to cut the shape from card stock or coloured paper.
- Try to study pictures of the blue footed booby and paint the cup and patterns and try to match with it or make your unique pattern.
- Make the break cut of the solids lines and glue it into a cone shape. Fold in all the tabs. Glue the beak to the cup by the tabs.
- To make the feet fold the rectangle shape in half and glue the top of the two feet to each side of the folded rectangle piece. Punch holes in both sides with a hole punch. Fold the feet at the top to about a 45 degree angle
- Punch a small hole in the middle of the bottom of the paper cup. Cut a piece of yarn or string about two feet long. Poke one end of the string through the hole to the inside of the cup. Put your hand inside the cup and pull the string down through the cup.
- Tie a big knot about six inches from the end of the string. Pull up on the string from the outside of the cup to bring the knot up against the bottom of the cup, make sure it won’t come out. If you can’t tie a big enough knot you can tie something to the string like a button or piece of cardboard.
- Tie the end of the string to the feet placing the string through both holes, tying it in the middle.
- Tie the other end of the string to the middle of a craft stick about six inches from the bottom of the cup
- Glue on the wings and eyes.
- Tie string to both ends of the craft stick and then tape the string to the wings and feet.
- Move the ends of the craft stick up and down to move the feet.


